
QIF Convert
by John Woodward
|
|
|
|
|
Many online banks and credit card companies allow you to download recent transactions (checks, deposits, credit card charges, etc.) into a file in the Quicken Interchange Format (QIF), so that you can import these transactions into your Quicken account. The problem with this approach is that typically the bank has no way of assigning meaningful categories to the transactions. So, if you care about categorizing your Quicken transactions, you must go through each transaction you have just imported in Quicken, and add categories. QIF Convert automates this process. QIF Convert adds Quicken categories based on the description (e.g. payee) of each transaction. To convert a QIF file, just drop it onto QIF Convert. You can configure QIF Convert as a browser helper application for files of type application/qif to have it run automatically on downloaded QIF files. QIF Convert converts each transaction in the QIF file by:
The conversion is controlled by instructions that you provide. You are prompted for instructions whenever QIF Convert does not know how to convert a transaction. You can also edit any instructions you have previously given. QIF Convert stores its output in two ways. Use the default if you download from only one account. The other way stores transactions from multiple accounts in the same file, and makes importing into Quicken easier. If you are a user of QIF Categories, click here for information on how these two programs are related. |
There are three ways to convert a QIF credit card or banking file using QIF Convert:
If QIF Convert is not already running when started using either of the first two methods, it will quit when it is done converting the files.
All conversions that QIF Convert performs are based on the description in each transaction. When QIF Convert encounters a description for which it does not have instructions, it prompts you for instructions with a dialog like the following.
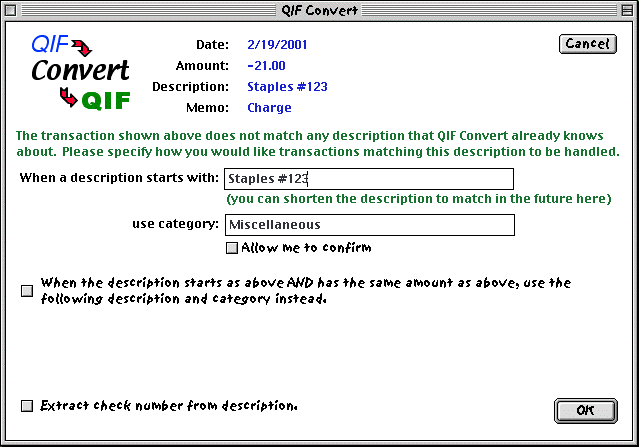
This dialog identifies the Date, Amount, Description, and Memo of the transaction being converted, and allows you to enter a category to be associated with the description in the future. You can shorten the description to match more transactions in the future. In the above example, the charge was to Staples store #123. If you made a future charge to a different Staples, these instructions would not apply unless you shortened the description to just "Staples". You cannot edit the description other than shortening it, because it must be an initial match for the transaction being converted.
You can also enter a category to be associated with this description in the future. While entering the category, the dialog acts like Quicken itself does when you enter a category, autocompleting categories you start typing from a list of categories. You can also "scroll" through the list of categories by using the up and down cursor keys.
The list of categories is kept as a text file called QuickenCategories in the same folder as QIF Convert. If it does not exist, QIF Convert will create the QuickenCategories file, and will continue to update it each time you enter a new category. It is recommended that you export your categories from Quicken into a file called QuickenCategories, and place that file in the same folder as QIF Convert. Thereafter, QIF Convert will maintain the file.
If you create a new category, the dialog will warn you, as shown below.

In this case, when you import the converted QIF file into Quicken, Quicken will update its list of categories.
You have the option (Allow me to confirm) to specify that each time this instruction is applied, you should be shown the transaction and given the opportunity to change the description or category. If you leave this unchecked, the category will be automatically and silently changed whenever a transaction description matches the description in the instruction. See below for other ways to cause transactions to be confirmed.
You have the option of specifying a new description and category for the transaction based on the description and the amount. This option does not make sense for this transaction, and is left unchecked. See below for an example of when you might want to check this option.
Because the transaction description contains a number, the dialogs above give you the option of extracting a check number from the description. Since the number in the description is a store number and not a check number, this option would not make sense in this case, and is left unchecked. See below for an example of when you might want to check this option.
When you click OK, a new instruction is created, and the transaction is converted into the output file.
When matching a description in a transaction with instructions, the longest description (from the instructions) that matches the start of the transaction description is used. For example, given the description "Transfer to savings", the instructions description "Transfer to savings" would be used, instead of the instructions description "Transfer".
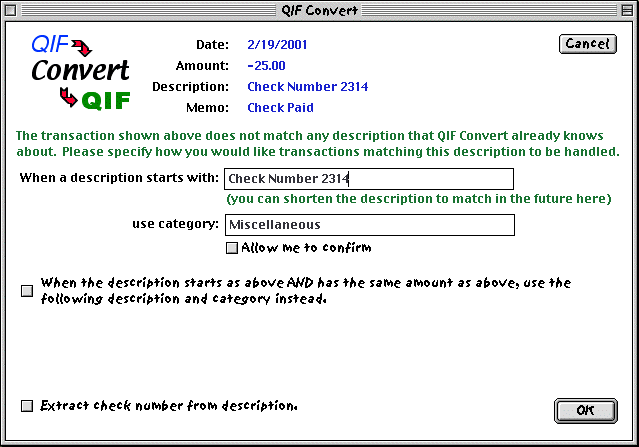
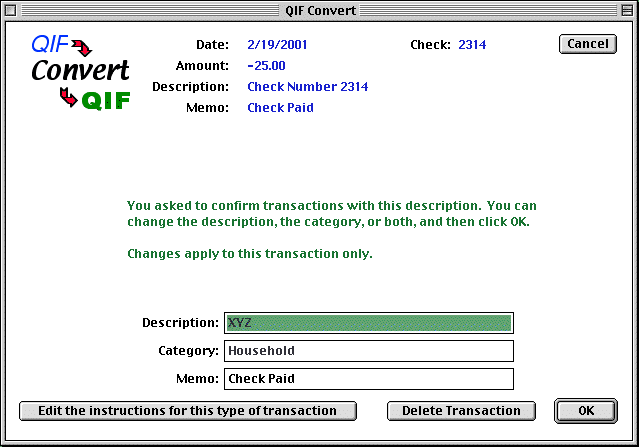
QIF Convert has several features designed to make the handling of Check transactions easier. Check transactions are usually downloaded from banks without specifying the payee in the description. Also, check transaction descriptions often contain the check number. Consider the transaction shown in the dialog below.
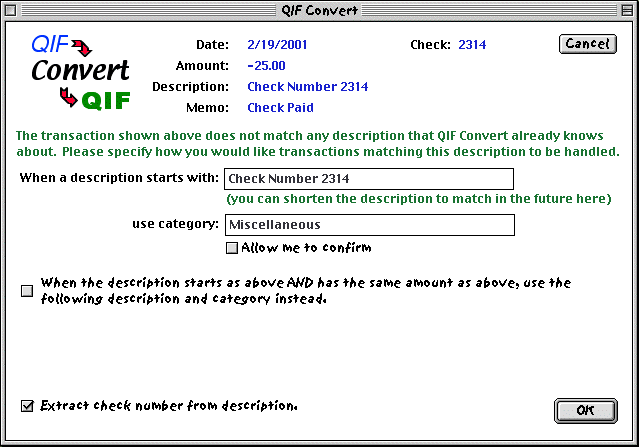
If you want Quicken to store the check number as a Quicken check number, then turn on the Extract check number from description option. When you do so, the display changes as shown below. Note that the extracted check number now appears at the top of the dialog, indicating that it will be stored as a Quicken check number.
Now, let's say you write a check each month or each week to the same payee for the same amount. For example, If you write a check each week to XYZ for $25.00, this would typically download from your bank as shown in the above dialog. In this case, you might want to edit the description to match to be just "Check Number", and check the When the description starts as above AND has the same amount as above, use the following description and category instead box. The result would be as shown below.
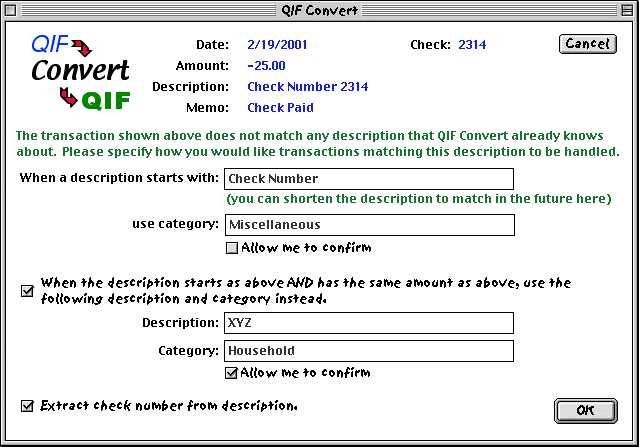
After checking the box, you enter the new payee for the transaction, and the new category. Allow me to confirm was checked just in case you sometime write a check to some payee other than XYZ for $25.
Here is a summary of the meaning of the above instructions:
The "normal" mode of operations is for QIF Convert to silently and automatically convert transactions based on the instructions you have provided. There are three cases however, in which you are allowed to confirm a transaction:
You are asked to confirm a transaction with a dialog as follows.
This dialog allows you to:
By default, QIF Convert prompts you for an output filename for each account converted, and stores the transaction from that account only in the output file. To import such a file into Quicken, you must first open the account in Quicken and then import the file. To use this default way of storing output files, make sure you leave the Give me the option to append output to the same file used last time preference unchecked.
If you download transactions from multiple accounts at the same time, you may prefer to check this option in the preferences. If you check this preference, you must export your accounts from Quicken, name the resulting file QuickenAccounts, and store this file in the same folder as QIF Convert. The first time you convert a file after checking this preference, you will get the following dialog.
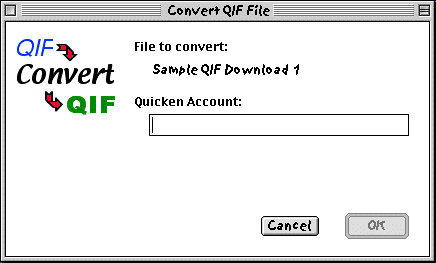
This dialog shows you the name of the file being processed (in case you dropped multiple files on QIF Convert), and allows you to specify the name of the Quicken account into which these transactions should be imported. When you type into the box, account names will be autocompleted using the account names you downloaded into QuickenAccounts. You can also use the UP and DOWN arrows to scroll through all account names. Only accounts of the type you are converting can be specified. In other words, if you are converting a bank account, only bank accounts can be specified. If you are converting a credit card account, only credit card accounts can be specified. If this restriction causes you not to be able to specify an account that you think you should be able to specify, there is a preference to remove this restriction.
To import a file created in this way, you need only start Quicken and import the file. You do not need to open the account first, since the account name will be stored in the file
This format also allows you to store transactions from multiple accounts in the same output file. If the output file you previously used has not been moved, renamed, or deleted, then the next time you convert a file you will get the following dialog.
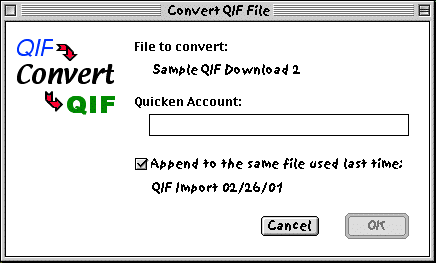
In this dialog you have the option putting transactions for another account in the same output file. You can put as many different accounts in the same file as you would like. When you import the file into Quicken, all of the accounts in the file will be updated.
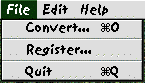
The File menu, as shown at the left, allows you to convert a file by selecting the file via a standard file dialog. This is an alternative to dropping files onto QIF Convert or having QIF Convert started as a browser helper application.
The File menu also allows you to enter your registration code, which you will receive via email after paying for QIF Convert.
The File menu also allows you to quit out of QIF Convert. If you are in the middle of converting a file or editing instructions, your changes will NOT be saved.
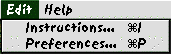
The Edit menu, as shown at the left, allows you to edit
existing instructions or to change
the preferences.
You can edit instructions you have previous given QIF Convert by selecting the Instructions... menu item under the Edit menu. When you do so, you will get the dialog that follows.
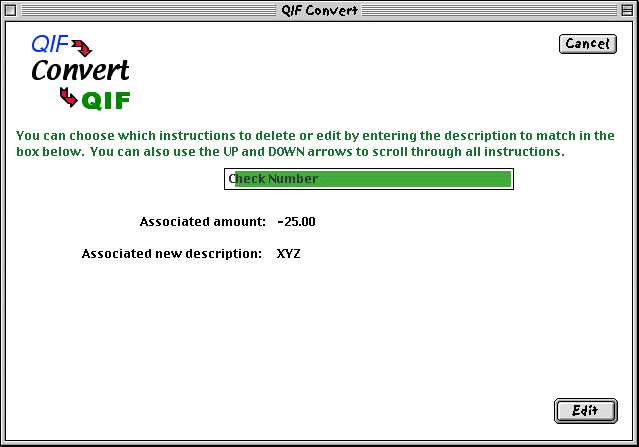
This dialog is shown after the letter "C" has been typed. The remainder of the first instruction description is autocompleted, and the associated amount and new description are shown to properly identify the instruction selected. If you then click on "Edit", the following dialog appears.
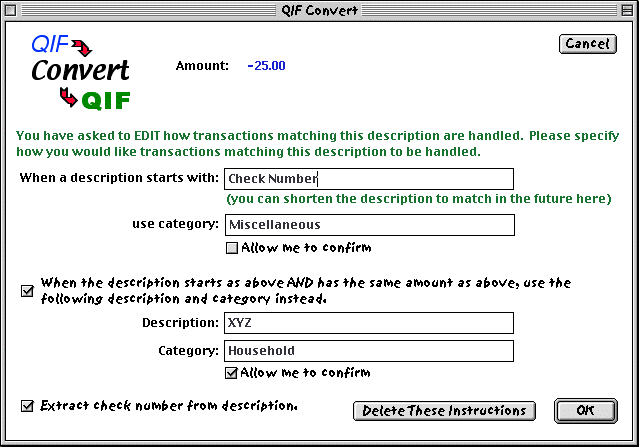
This dialog is similar to the one used to enter instructions the first time, with the exception that transaction fields are not shown at the top of the dialog. In this example, the amount is shown only because it is relevant to the instructions. Another difference is the Delete These Instructions button. If you click this button, these instructions will be deleted.
QIF Convert allows you to set four preferences. To set preferences, launch QIF Convert without dropping a file on it (e.g., just double-click it). Then select the Preferences... menu item under the Edit menu. You will get the dialog shown below.
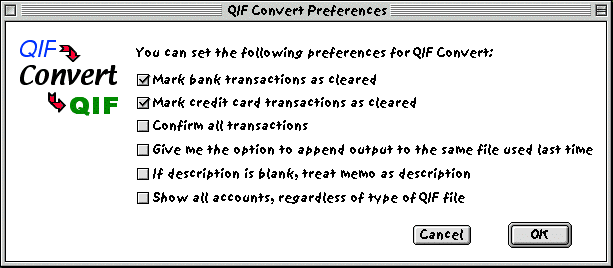
By default, both bank and credit card transactions will be marked as cleared when imported into Quicken. If you prefer, you can uncheck either option to have transactions not marked as cleared. If you check Confirm all transactions, you will be shown a confirmation dialog for each transaction converted. If you check Give me the option to append output to the same file used last time, you will have the option to store transactions from multiple accounts in the same output file.
Some banks produce QIF with blank descriptions and instead put transaction identification information in the memo field. In this case, check If description is blank, treat memo as description, which will replace the contents of blank descriptions with the memo field, and remove the memo field.
Some credit card companies produce QIF with a type of "Bank"instead of "Credit Card". In this case, if you are trying to specify your credit card account, it will not normally be available because it does not match the type of the QIF file. If you have such a credit card company, or suspect this applies to you, turn on the Show all accounts, regardless of type of QIF file option. With this option specified, all accounts can be chosen for all QIF file types, and the type of the resulting QIF file will match that of the account selected.
QIF Convert stores instructions in three data files in the same folder as QIF Convert: CategoryMappings, DescriptionMappings, CheckNumbers. You should not move, rename, delete, or edit these files. They are maintained by QIF Convert, and their contents can be changed if needed by editing your instructions.
It is recommended that you export your Quicken categories into a file named QuickenCategories and store this file in the same folder as QIF Convert. If you create new Quicken categories using QIF Convert, these categories will be added to this file.
If you choose to use the feature whereby QIF Convert stores transactions from multiple accounts in the same output file, then you must export your Quicken accounts into a file named QuickenAccounts and store this file in the same folder as QIF Convert. This file is never changed by QIF Convert. If you add an account in Quicken, you should export your accounts again.
If you also use the program QIF Web Extract, which extracts transaction information from brokerage web pages and converts it to QIF, you should know that both programs use CategoryMappings, QuickenCategories, and QuickenAccounts files. You can certainly put these two programs in different folders, but if you prefer, you can put them in the same folder and they can share these files that they use in common.
QIF Convert should run on a Macintosh with MacOS System 7.5.3 through 9.0.4. I don't know about MacOS X yet. If you find that it does or does not work properly on some particular Macintosh model or MacOS version, please let me know.
1.8 - Several improvements/bug fixes:
1.7 - Added support for certain banks that produce QIF that does identify whether the QIF is for a bank or credit card. More specifically, it now supports files without "!Type"at the start. Such files can be processed only if the Give me the option to append output to the same file used last time preference is not turned on.
1.6 - Several improvements/bug fixes:
1.5 - Added a new preference to handle the case of credit card companies that erroneously download QIF with a type of "Bank"instead of "Credit Card."
1.4 - Several improvements/bug fixes:
1.3 - Several improvements:
1.2 - Added several features based on user feedback:
1.1 - Initial release.
QIF Convert is shareware. You can try it out for 60 days, but if you still use it thereafter, you must register it. The price is very reasonable--$10. After 60 days, QIF Convert will not work unless you have registered it.
|
|
You can pay with a credit card via PayPal by clicking on the button to the left. |
You may distribute QIF Convert unmodified via any media, as long as you keep it together with this documentation.